Blackjack strategy chart: every rule set, with printable cards
Blackjack strategy charts for 6-deck S17, dealer hits soft 17 and UK no hole card rules, the cells that change between them, and printable PDF cards.
A blackjack strategy chart shows the best play for every starting hand against every dealer up-card. The catch is that "best" depends on the rules, so this page gives you the chart for each common rule set, a table of exactly which cells change between them, and printable versions. For the reasoning behind the decisions, read the basic blackjack strategy guide. To check one hand quickly, use the blackjack strategy calculator.
Key for every chart: H hit · S stand · D double (hit if not allowed) · Ds double (stand if not allowed) · P split · R surrender (hit if not allowed)
Choose your rules
| If your game is... | Use this chart |
|---|---|
| Online RNG table, 4 to 8 decks, dealer stands on soft 17, dealer checks for blackjack | Chart 1: standard |
| Any game where the dealer hits soft 17 | Chart 2: dealer hits soft 17 |
| UK casino table or UK live dealer table (dealer takes no hole card) | Chart 3: UK no hole card |
| Any game with no doubling after a split | Chart 1 with the no-DAS changes |
| Single deck or double deck | Single deck page, strategy by deck count |
| Free Bet Blackjack | Free Bet chart |
Not sure which rules apply? In an online game, open the information or rules panel and look for the number of decks, "dealer stands on soft 17" or "dealer hits soft 17", and whether the dealer "peeks" or takes a hole card. How to find the rules.
Chart 1: standard (6 deck, dealer stands on soft 17)
Rules: 4 to 8 decks, dealer stands on soft 17, double on any two cards, double after split allowed, late surrender available, dealer checks for blackjack. House edge with this chart: about 0.33% with surrender, 0.4% without.
Hard totals
| Hand | 2 | 3 | 4 | 5 | 6 | 7 | 8 | 9 | 10 | A |
|---|---|---|---|---|---|---|---|---|---|---|
| 5 to 8 | H | H | H | H | H | H | H | H | H | H |
| 9 | H | D | D | D | D | H | H | H | H | H |
| 10 | D | D | D | D | D | D | D | D | H | H |
| 11 | D | D | D | D | D | D | D | D | D | H |
| 12 | H | H | S | S | S | H | H | H | H | H |
| 13 | S | S | S | S | S | H | H | H | H | H |
| 14 | S | S | S | S | S | H | H | H | H | H |
| 15 | S | S | S | S | S | H | H | H | R | H |
| 16 | S | S | S | S | S | H | H | R | R | R |
| 17+ | S | S | S | S | S | S | S | S | S | S |
Soft totals
| Hand | 2 | 3 | 4 | 5 | 6 | 7 | 8 | 9 | 10 | A |
|---|---|---|---|---|---|---|---|---|---|---|
| A,2 | H | H | H | D | D | H | H | H | H | H |
| A,3 | H | H | H | D | D | H | H | H | H | H |
| A,4 | H | H | D | D | D | H | H | H | H | H |
| A,5 | H | H | D | D | D | H | H | H | H | H |
| A,6 | H | D | D | D | D | H | H | H | H | H |
| A,7 | S | Ds | Ds | Ds | Ds | S | S | H | H | H |
| A,8 | S | S | S | S | S | S | S | S | S | S |
| A,9 | S | S | S | S | S | S | S | S | S | S |
Pairs
| Hand | 2 | 3 | 4 | 5 | 6 | 7 | 8 | 9 | 10 | A |
|---|---|---|---|---|---|---|---|---|---|---|
| A,A | P | P | P | P | P | P | P | P | P | P |
| 2,2 | P | P | P | P | P | P | H | H | H | H |
| 3,3 | P | P | P | P | P | P | H | H | H | H |
| 4,4 | H | H | H | P | P | H | H | H | H | H |
| 5,5 | D | D | D | D | D | D | D | D | H | H |
| 6,6 | P | P | P | P | P | H | H | H | H | H |
| 7,7 | P | P | P | P | P | P | H | H | H | H |
| 8,8 | P | P | P | P | P | P | P | P | P | P |
| 9,9 | P | P | P | P | P | S | P | P | S | S |
| 10,10 | S | S | S | S | S | S | S | S | S | S |
Chart 2: dealer hits soft 17 (H17)
Rules: as Chart 1, except the dealer hits soft 17. Common in US-style online tables and some live games. House edge: about 0.2% higher than Chart 1 under otherwise equal rules. Five cells change, all towards more aggressive play, because a dealer who hits soft 17 makes more strong hands and busts slightly more often.
Hard totals
| Hand | 2 | 3 | 4 | 5 | 6 | 7 | 8 | 9 | 10 | A |
|---|---|---|---|---|---|---|---|---|---|---|
| 5 to 8 | H | H | H | H | H | H | H | H | H | H |
| 9 | H | D | D | D | D | H | H | H | H | H |
| 10 | D | D | D | D | D | D | D | D | H | H |
| 11 | D | D | D | D | D | D | D | D | D | D |
| 12 | H | H | S | S | S | H | H | H | H | H |
| 13 | S | S | S | S | S | H | H | H | H | H |
| 14 | S | S | S | S | S | H | H | H | H | H |
| 15 | S | S | S | S | S | H | H | H | R | R |
| 16 | S | S | S | S | S | H | H | R | R | R |
| 17+ | S | S | S | S | S | S | S | S | S | S |
Soft totals
| Hand | 2 | 3 | 4 | 5 | 6 | 7 | 8 | 9 | 10 | A |
|---|---|---|---|---|---|---|---|---|---|---|
| A,2 | H | H | H | D | D | H | H | H | H | H |
| A,3 | H | H | H | D | D | H | H | H | H | H |
| A,4 | H | H | D | D | D | H | H | H | H | H |
| A,5 | H | H | D | D | D | H | H | H | H | H |
| A,6 | H | D | D | D | D | H | H | H | H | H |
| A,7 | Ds | Ds | Ds | Ds | Ds | S | S | H | H | H |
| A,8 | S | S | S | S | Ds | S | S | S | S | S |
| A,9 | S | S | S | S | S | S | S | S | S | S |
Pairs
| Hand | 2 | 3 | 4 | 5 | 6 | 7 | 8 | 9 | 10 | A |
|---|---|---|---|---|---|---|---|---|---|---|
| A,A | P | P | P | P | P | P | P | P | P | P |
| 2,2 | P | P | P | P | P | P | H | H | H | H |
| 3,3 | P | P | P | P | P | P | H | H | H | H |
| 4,4 | H | H | H | P | P | H | H | H | H | H |
| 5,5 | D | D | D | D | D | D | D | D | H | H |
| 6,6 | P | P | P | P | P | H | H | H | H | H |
| 7,7 | P | P | P | P | P | P | H | H | H | H |
| 8,8 | P | P | P | P | P | P | P | P | P | R |
| 9,9 | P | P | P | P | P | S | P | P | S | S |
| 10,10 | S | S | S | S | S | S | S | S | S | S |
Changed cells are in bold. 8,8 against an ace surrenders if surrender is offered; if not, split as normal.
Chart 3: UK and European no hole card
Rules: 6 decks, dealer stands on soft 17, double on any two cards, double after split allowed, no surrender, dealer takes no hole card and does not check for blackjack until all players have acted. This is the standard rule set in UK land-based casinos and on most UK live dealer tables. House edge with this chart: about 0.5%.
Because the dealer may turn over a blackjack after you have doubled or split, any extra stake is also lost. Five cells change from Chart 1, all towards not putting more money on the table against a 10 or an ace. Surrender cells become hits because surrender is not offered.
Hard totals
| Hand | 2 | 3 | 4 | 5 | 6 | 7 | 8 | 9 | 10 | A |
|---|---|---|---|---|---|---|---|---|---|---|
| 5 to 8 | H | H | H | H | H | H | H | H | H | H |
| 9 | H | D | D | D | D | H | H | H | H | H |
| 10 | D | D | D | D | D | D | D | D | H | H |
| 11 | D | D | D | D | D | D | D | D | H | H |
| 12 | H | H | S | S | S | H | H | H | H | H |
| 13 | S | S | S | S | S | H | H | H | H | H |
| 14 | S | S | S | S | S | H | H | H | H | H |
| 15 | S | S | S | S | S | H | H | H | H | H |
| 16 | S | S | S | S | S | H | H | H | H | H |
| 17+ | S | S | S | S | S | S | S | S | S | S |
Soft totals
Identical to Chart 1.
| Hand | 2 | 3 | 4 | 5 | 6 | 7 | 8 | 9 | 10 | A |
|---|---|---|---|---|---|---|---|---|---|---|
| A,2 | H | H | H | D | D | H | H | H | H | H |
| A,3 | H | H | H | D | D | H | H | H | H | H |
| A,4 | H | H | D | D | D | H | H | H | H | H |
| A,5 | H | H | D | D | D | H | H | H | H | H |
| A,6 | H | D | D | D | D | H | H | H | H | H |
| A,7 | S | Ds | Ds | Ds | Ds | S | S | H | H | H |
| A,8 | S | S | S | S | S | S | S | S | S | S |
| A,9 | S | S | S | S | S | S | S | S | S | S |
Pairs
| Hand | 2 | 3 | 4 | 5 | 6 | 7 | 8 | 9 | 10 | A |
|---|---|---|---|---|---|---|---|---|---|---|
| A,A | P | P | P | P | P | P | P | P | P | H |
| 2,2 | P | P | P | P | P | P | H | H | H | H |
| 3,3 | P | P | P | P | P | P | H | H | H | H |
| 4,4 | H | H | H | P | P | H | H | H | H | H |
| 5,5 | D | D | D | D | D | D | D | D | H | H |
| 6,6 | P | P | P | P | P | H | H | H | H | H |
| 7,7 | P | P | P | P | P | P | H | H | H | H |
| 8,8 | P | P | P | P | P | P | P | P | H | H |
| 9,9 | P | P | P | P | P | S | P | P | S | S |
| 10,10 | S | S | S | S | S | S | S | S | S | S |
Changed cells are in bold. A full explanation of UK rules, including what each major live casino provider uses, is on the UK blackjack strategy guide.
No double after split
Some games (usually RNG tables and a few live ones) do not let you double after splitting. That makes low pairs less valuable, because part of the value of splitting 2s, 3s, 4s and 6s comes from doubling a good second card. Apply these changes to whichever chart you are using:
| Pair | With DAS | Without DAS |
|---|---|---|
| 2,2 | Split v 2 to 7 | Split v 4 to 7, hit v 2, 3 |
| 3,3 | Split v 2 to 7 | Split v 4 to 7, hit v 2, 3 |
| 4,4 | Split v 5, 6 | Never split (hit) |
| 6,6 | Split v 2 to 6 | Split v 3 to 6, hit v 2 |
No other cells change. The rule adds about 0.14% to the house edge.
Which cells change between charts
If you already know Chart 1, this is everything you need to remember for the other two.
| Hand | Chart 1 (S17, hole card) | Chart 2 (H17) | Chart 3 (UK, no hole card) |
|---|---|---|---|
| 11 v 10 | Double | Double | Hit |
| 11 v A | Hit | Double | Hit |
| 15 v 10 | Surrender | Surrender | Hit (no surrender) |
| 15 v A | Hit | Surrender | Hit |
| 16 v 9, 10, A | Surrender | Surrender | Hit (no surrender) |
| A,7 v 2 | Stand | Double | Stand |
| A,8 v 6 | Stand | Double | Stand |
| A,A v A | Split | Split | Hit |
| 8,8 v 10 | Split | Split | Hit |
| 8,8 v A | Split | Surrender (split if not offered) | Hit |
Everything not listed is the same in all three.
Download and print
Download a chart
Choose the same rule profile as your table. All files are generated from the calculator’s decision data.
| Rules | A4 PDF | Pocket PDF | Phone PNG |
|---|---|---|---|
| Standard S17 | A4: Standard S17 | Pocket card: Standard S17 | Wallpaper: Standard S17 |
| Dealer hits soft 17 | A4: Dealer hits soft 17 | Pocket card: Dealer hits soft 17 | Wallpaper: Dealer hits soft 17 |
| UK no hole card | A4: UK no hole card | Pocket card: UK no hole card | Wallpaper: UK no hole card |
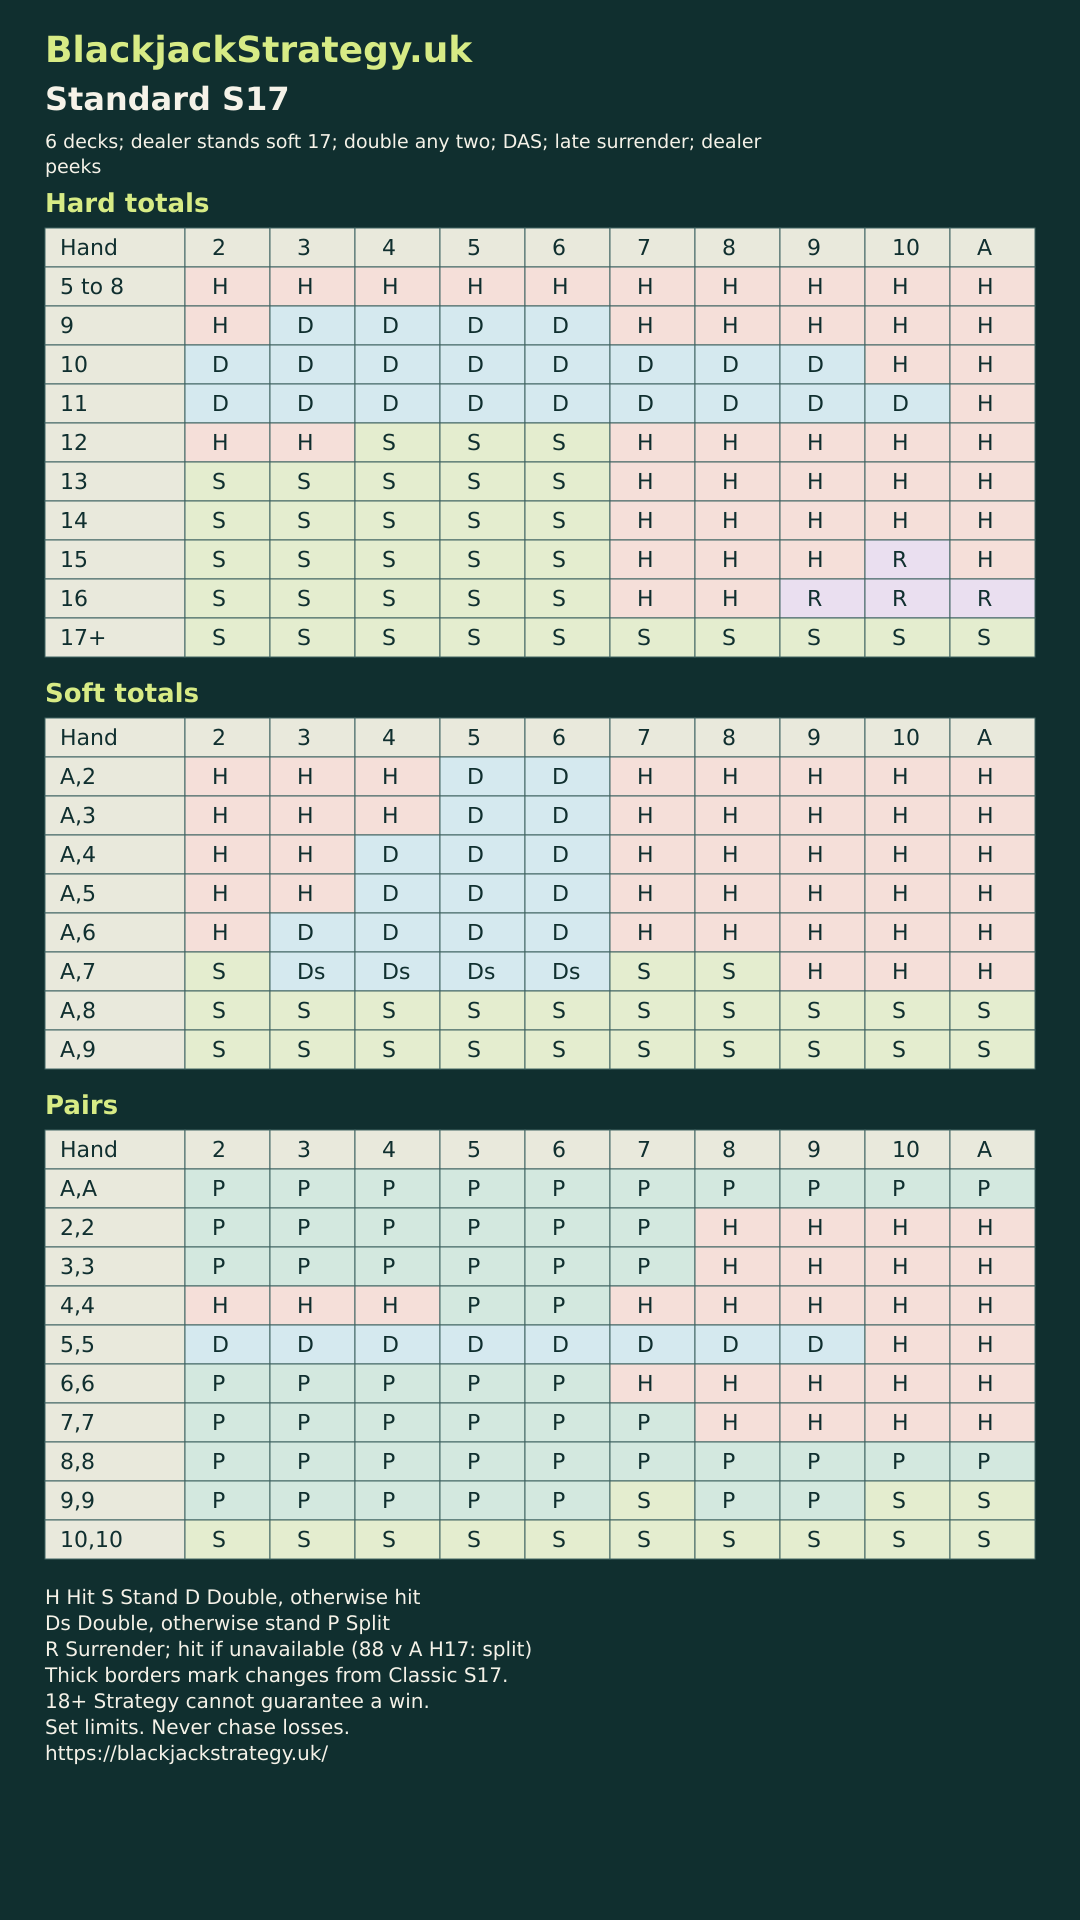
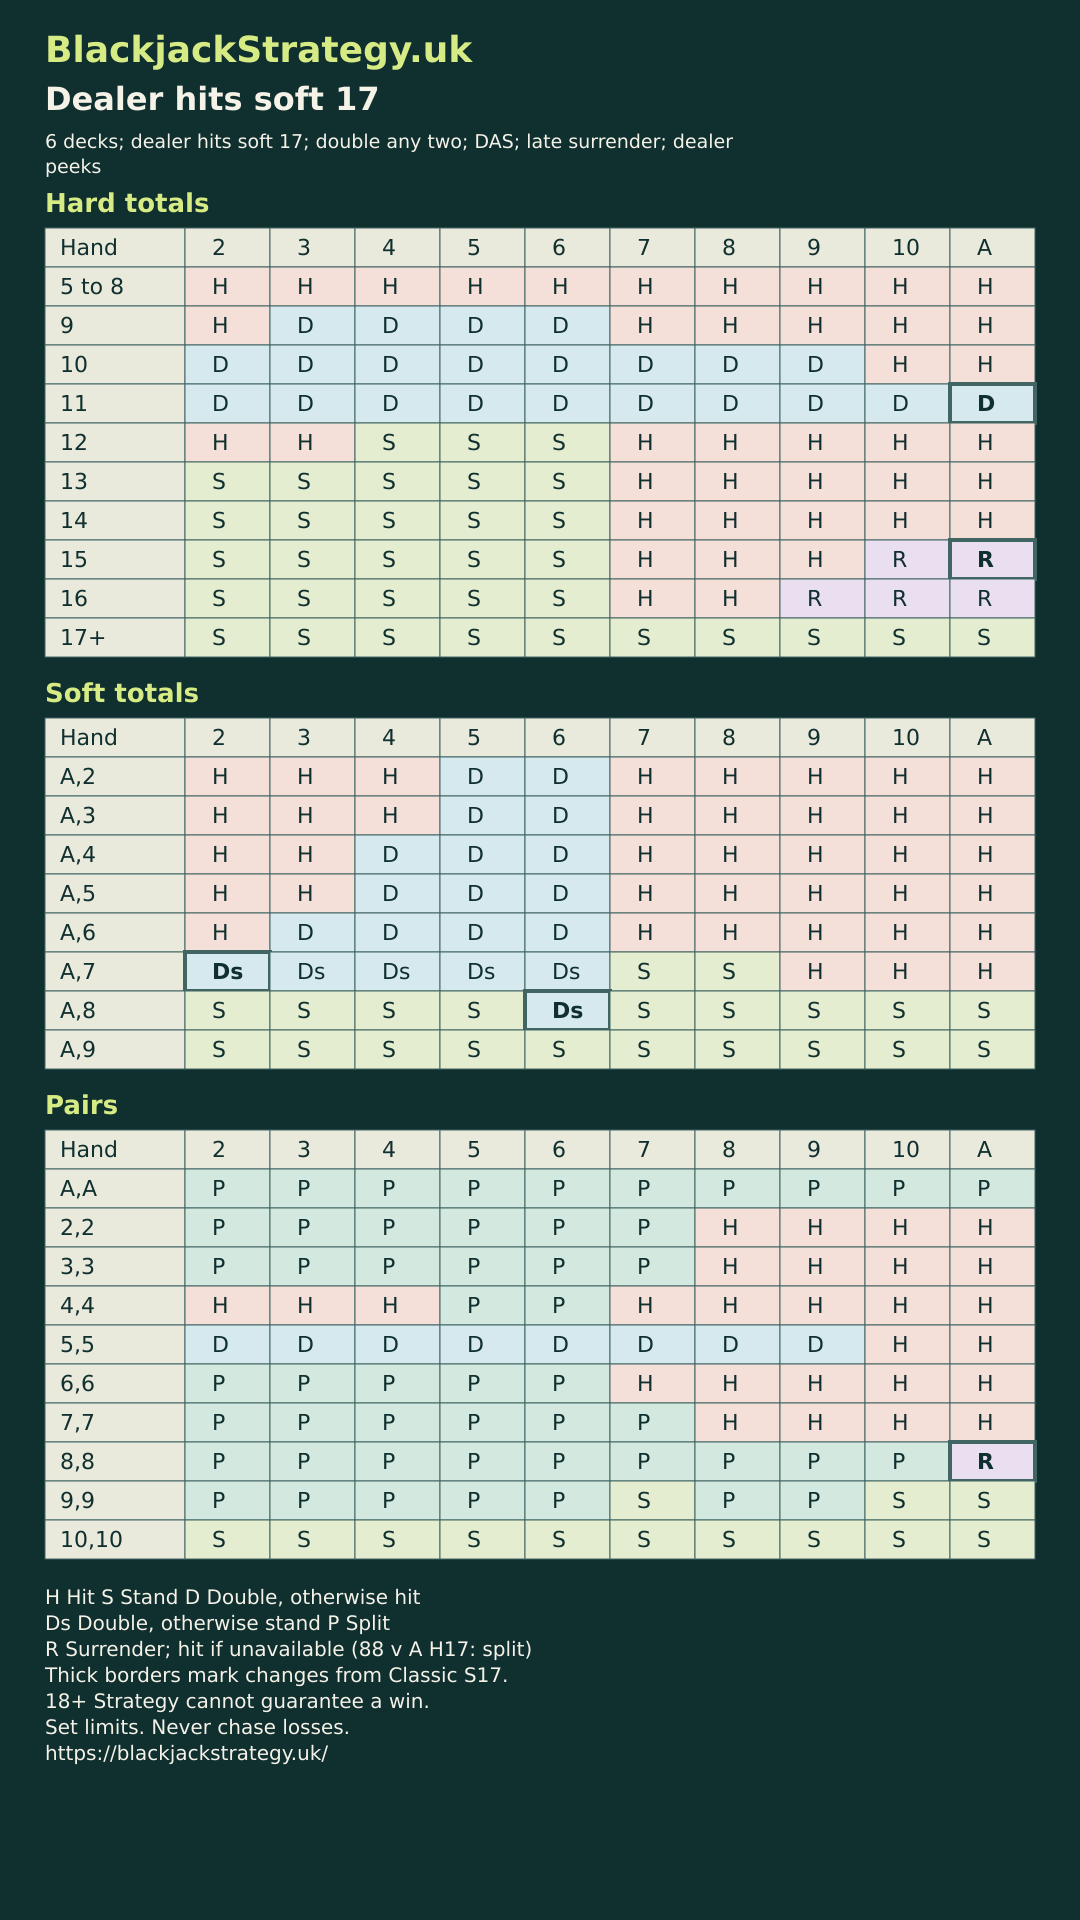
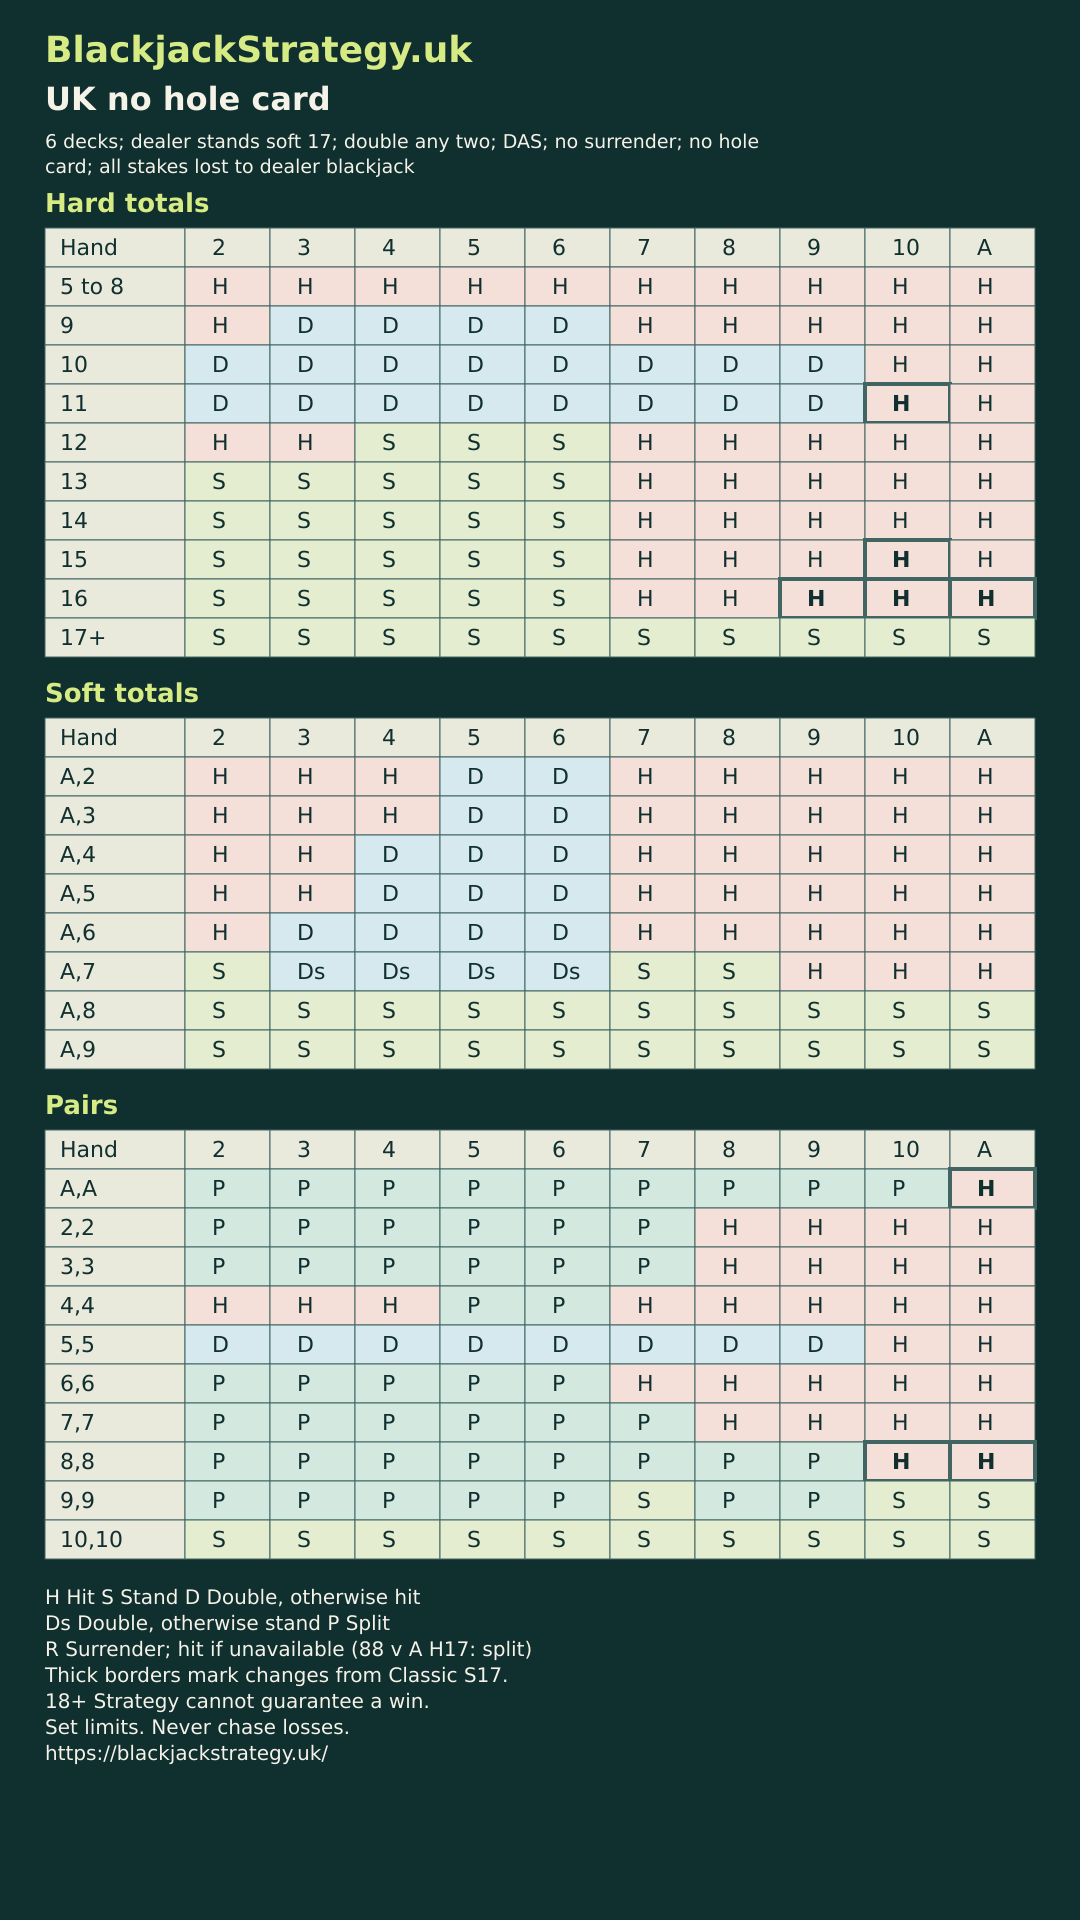
H Hit | S Stand | D Double, otherwise hit | Ds Double, otherwise stand | P Split | R Surrender, otherwise hit (88 v A H17: otherwise split)
Every file states its rules in the header, so you do not pick up the wrong one at the table.
How to read the chart
- Find the dealer's up-card along the top.
- Decide whether your hand is a pair, soft or hard, in that order.
- Find your row in the matching table.
- Read the cell. If the action is not allowed (no double on three cards, no surrender), use the fallback in the key.
Example: 9,9 against a 7 under Chart 1. Pairs table, row 9,9, column 7: S. Stand on 18. Against an 8, the same row says P: split.
The basic blackjack strategy guide explains why each row is the way it is, which makes the chart much easier to remember than learning it cell by cell.
What the chart assumes and why it matters
| Rule | UK default | Cost if worse | Which cells it changes |
|---|---|---|---|
| Blackjack pays 3:2 | Yes | 6:5 adds about 1.4% | None. Avoid 6:5 games regardless of strategy. |
| Dealer stands on soft 17 | Yes | H17 adds about 0.2% | 5 cells (Chart 2) |
| Double on any two cards | Yes | Double 10, 11 only adds about 0.18% | Hard 9 and all soft doubles become hits |
| Double after split | Yes | No DAS adds about 0.14% | 4 low-pair rows |
| Resplit to 3 or 4 hands | Usually | No resplit adds about 0.1% | None |
| Late surrender | Rare in UK | No surrender adds about 0.07% | R cells become H |
| Dealer checks for blackjack | No in UK | No hole card adds about 0.1% | 5 cells (Chart 3) |
| 6 decks | Yes | 8 decks adds about 0.02% | None |
Using a strategy card at the table
UK casinos allow strategy cards at blackjack tables, and online games cannot see what you have open on another screen. The card is a reference, not a device, and using one is not counting. The only practical courtesy is not to hold up a live table while you look up a hand: learn the common decisions first and keep the card for the rare ones. The blackjack strategy trainer is the quickest way to get there.
Frequently asked questions
Is there one strategy chart for every blackjack game?
No. The decisions depend on the number of decks, whether the dealer hits soft 17, whether the dealer takes a hole card, and what doubling, splitting and surrender options are offered. The three charts on this page cover nearly every UK game. The cells that differ between them are listed above, and there are only ten.
Which chart should I use for online blackjack in the UK?
Live dealer tables from Evolution, Playtech and Pragmatic Play generally deal no hole card and stand on soft 17, so use Chart 3. RNG tables vary: many use US-style rules with a hole card and surrender, which is Chart 1. Check the game's rules panel.
Why does the chart tell me to hit 12 against a 3 but stand against a 4?
The dealer busts about 37% of the time from a 3 and 40% from a 4. Hitting 12 busts 31% of the time. At a 3 the dealer's bust chance is not high enough to justify standing; at a 4 it is. The boundary falls between those two cards.
Is a blackjack strategy card the same as a chart?
Yes. "Card" usually means a printed, pocket-sized version of the chart. The downloads above include one for each rule set.
Can I use the chart when the dealer has already turned over a card?
The chart is for your first two cards against the dealer's up-card. After you hit, the hand is a new hard or soft total and you read it again as a hard or soft hand; doubles, splits and surrender are not available on three or more cards. The blackjack strategy calculator handles multi-card hands.
Does the chart work for Blackjack Switch, Free Bet or Pontoon?
No. Those games change the rules enough to need their own charts. See Free Bet Blackjack strategy and the online blackjack strategy page for the variants.